When to use a Chatbot
Use a Chatbot when people need an interactive conversation to ask questions, explore a topic, or complete a guided task. Before creating one, look for an existing Chatbot in Public Libraries or your organization libraries.1. Open the Chatbot creator
From the signed-in Launchpad, select New, then choose New Chatbot. Blueprint opens the Chatbot setup form. The initial form registers the Chatbot with only the information needed to create it. Configuration such as visibility, categories, tags, prompt blocks, and deployments comes after creation.2. Enter the Chatbot name
In Name, enter a clear name that tells people what the Chatbot helps with, such as “Benefits Help Desk” or “Customer Onboarding Guide.” Avoid names that only identify a project code, model, or internal ticket.3. Describe the purpose and audience
In Description, summarize the Chatbot’s purpose, domain, and primary audience. Include the kinds of questions it should answer, the work it should guide, and important boundaries.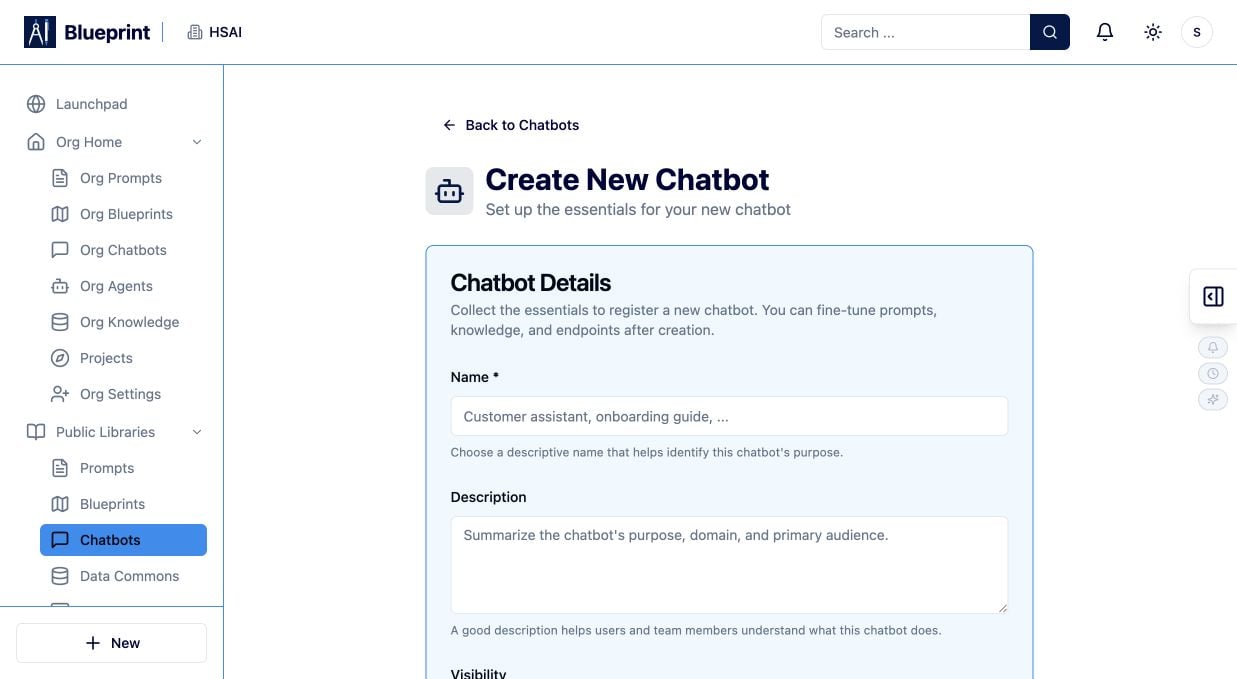
4. Create the Chatbot
Select Create Chatbot. Blueprint opens the new Chatbot’s workspace. The setup form does not configure visibility, categories, tags, prompt blocks, API sources, or deployments. Configure those items from the Chatbot workspace after the Chatbot exists.5. Review the Chatbot workspace
The Chatbot workspace includes these areas:- Overview — review the Chatbot summary and current status.
- Chat — run a conversation manually while you develop and refine the Chatbot.
- Manage — update the name and description, add categories and tags, set the slug, choose the status, choose visibility, and select the default AI connection. Manage also contains the structured System Prompt Blocks used to assemble the Chatbot’s instructions.
- Knowledge — review and configure the knowledge available to the Chatbot.
- API Sources — add approved external API sources for dynamic data injection.
- Configure — set the chat experience, including display mode, title, streaming, copy and print options, downloads, conversation history, voice chat, privacy text, file uploads, links, theme, dimensions, welcome message, starter prompts, metadata, and preview.
- Deployments — save deployment configurations, manage allowed origins, and copy HTML, React, or WordPress embed code.
- Test Scenarios — create or associate repeatable test scenarios with a deployment.
- Logs — review conversations, filter activity, refresh results, and export CSV data.
6. Configure the Chatbot
Open Manage first and define the Chatbot’s operating instructions.- Confirm the name and description.
- Add only the categories and tags that help people discover the Chatbot.
- Set the status and visibility for the current stage. Use Private while developing, Organization for approved internal use, or Public when the Chatbot and its knowledge are ready for broader access.
- Select the default AI connection.
- Build the System Prompt Blocks in the intended order. Review the starting prompts, retrieval context, API data, metadata, and ending prompts so the Chatbot receives the right context at each stage.
7. Configure the user experience
Open Configure and set the interaction that users will see. Choose the display mode, title, welcome message, starter prompts, theme, dimensions, and available actions. Review privacy text, file-upload behavior, link handling, conversation history, voice chat, and any metadata or document-set filtering. Use the preview to check the experience at the intended size before saving the configuration.8. Test the Chatbot
Use Chat for exploratory conversations. Use Test Scenarios for repeatable checks connected to a deployment. Test:- Normal questions within the intended scope.
- Follow-up questions that depend on earlier context.
- Missing, ambiguous, or incomplete information.
- Questions that require knowledge retrieval or API data.
- Out-of-scope, unsafe, or permission-sensitive requests.
- Different screen sizes and deployment contexts.
9. Deploy the Chatbot
When the Chatbot passes its tests, open Deployments.- Create or select a deployment configuration.
- Add the allowed origins for the site where the Chatbot will run.
- Review the generated HTML, React, or WordPress embed code.
- Deploy it only to an approved environment.
- Run a final conversation test in the deployed experience.
Chatbot creation checklist
- The name and description clearly state the purpose and audience.
- Visibility, status, categories, and tags match the current lifecycle.
- System Prompt Blocks are ordered and reviewed.
- Knowledge and API Sources are approved and tested.
- Configure settings match the intended user experience.
- Test Scenarios cover normal, edge-case, and out-of-scope requests.
- Logs have been reviewed after testing.
- Allowed origins and embed code are limited to approved deployments.